Friday, February 26, 2010

Clara, the Bird Whisperer


Wow! That's 4 cards this week. Aren't I entitled to a medal.. or an award...or at least a pat on the back and an "at a girl"? LOL!!

Meet Clara, another amazing image from Kraftin' Kimmies Moonlight Whispers line. She is the sweetest of the images that I received. Nope, not a single mischievous bone in her body...but, I like her anyway ;D

I kept this layout fairly simple and didn't really add much in the way of embellishments. Not even a single paper flower! I know, that's a crime! It just didn't need it. HOWEVER...I couldn't resist adding just a touch of glitter glue to the edge of the top panel, 'cuz even a classy gal like Clara enjoys a bit of sparkle from time to time :D

Check out what one of my talented stampin' buddies, Kathy R., created with Clara over on her blog, The Daily Marker. That Kathy is such an enabler. She gave gave me a horrible case of the "I neeeeeeeeed this stamp!".

That's it for today, Have a fabbie weekend!

Thursday, February 25, 2010

Rosy, Posy...


Hello, everyone! I had such a great time on the Bombshell Blog Hop yesterday, I can't wait to do it again! Remember, it's open to everyone and takes place on the last Wednesday of each month. If you're interested, drop by the Bombshell Stamps site and pop into the forum for details. I hope I see you there ;D

I'm back to playing with the new Kraftin' Kimmie Moonlight Whispers stamps that my mom sent me for Valentine's Day. These gals just bring a smile to my face, especially the devious ones like Drucilla and Charlotte. HOWEVER, today's card features Posy, who by all outward appearances seems as sweet as pie and as happy as sunshine. BUT, what's that little wink all about? Does she know a secret? Has she got something on you and you better not cross her or there will be trouble with a capital "T"? Or maybe she brings to mind the image of a creepy Stepford Wife. Hahaha! I'll leave you to ponder that one ;D

When I first received these stamps, I stamped them off and colored them up as fast as my pudgy hands could shove my Copics around on the paper. Do you ever do that? Stamp off and color a bunch of images? I've been doing that more and more lately, and I've found I can whip together a card super quick, by just adding papers and embellies. Today, Posy has been paired with some older coordinated Basic Grey papers from the Lollipop Shoppe Collection that I found crammed in my bulging paper bins. It's a sickness, I tell ya'! A couple of flowers, gems, and a ribbon finish her off.

Hope your day is filled with sunshine...and Posy does, too *wink*.

Wednesday, February 24, 2010

Blog Hoppin' with the Bombshells


Hello, everyone! This is my first ever blog hop and wow...am I excited! The last Wednesday of each month the Bombshell Girls put on a blog hop that's open to the public. Do you have some Bombshell Stamps that you want to get inky? Or do you have your eye on some sassy Bombshell images and you're just looking for the right excuse to add them to your stash? Look no further! Join the hop next month by heading over to Bombshell Stamps and pop into the forum for details. You'll be glad you did ;D

February's hop challenge was created by the oh so talented Inky Button (Angela). It's called Mama Said Knock You Out! Don't you just love that title...LOL! Here's what Angela had to say:

"No physical violence here, just time to dust off your PUNCHES and use your NESTIES (QuicKutz, Sizzix, Big Shot etc.) to create your next Bombshell Masterpiece! We all have some fun punches and cutting shapes lying around, so why not use these valuable items and get our money's worth? All you have to do, is make sure something on your card has been punched or die cut....extra credit if there's a hole in your card. *giggle Don't make Mama mad....just start knockin' things out. *wink"


I'm a Nesties girl through and through, so there was no need to dust them off, because I have them sitting next to me at all times. If I could figure out how to lug my Nesties and my CuttleBug to the bank, the post office, or MVD, I would be cranking out die cuts while I wait in line! For this card I used Labels 4 and Labels 8, and colored the image with Copic Markers (my other favorite tool).

My card features a feisty little filly named, Anita Mann. You may of heard of her cousin, Robin DeBanks, or her nemesis, Bessie Mae Mucho. Hahaha! Nope, I'm not that clever...I pulled these names off the Internet by Googling "Best Drag Queen Names". However, don't be mistaken...Anita is 100% woman!

Thanks for stopping by, now be sure and head over to the rest of the awesome blog hoppers and check out their fantastic work! Get ready for loads of inspiration!


PerkyNihilist
BoHoRose
Patti
Stempelientje
Meredith
Erika
Angela
Sy
Cheryl You are here!
MaryG
Kas
Kathi
MissMagoo
Gabby
Steph
Kelli
Kim
Angie
Sunghee
Sarah

Monday, February 22, 2010

Let's Stick Together


Here is another card using one of the fabulous Moonlight Whisper images from Kraftin' Kimmies. I just can't get enough of these stamps! They are too cool! This little girl is named Drucilla and she is a holding a voodoo doll. Hmmm...I wonder who the victim is? LOL! And, how about that hair. My Copics got away from me a bit in this area, "shhh" don't tell ;) UGH! On closer inspection, it looks like I made a complete mess of the hair. I'll have to do better next time!

Theses images just crack me up, because they are so sweet and mischievous at the same time. They are super fun to color and I can tell that I will be using them to create cards for all sorts of occasions. Couldn't you just see using this on a "Get Well Soon" card? Fabulous!

When the mouse is away...


...the cats will play! While I was in the computer room uploading my Charlotte photos, I left my photo stuff set up but unattended. Here's what I came back to...lol! Isn't she a beauty! That's Charlie and she is 12 years old. She's a bit chunky at a hefty 18 lbs., but us big girls have to stick together ;D This setup works pretty well for cards, but not so much for kitties. The photos are little on the dark side, sorry about that. Did you see the "heart" on her left side in the second photo? Too dang cute.

Saturday, February 20, 2010

Let me introduce you to Charlotte..


Just a day or two before Valentines Day, I received the most amazing package in the mail from my mom. She is a very generous person, but this little parcel took the cake. It was filled with her gorgeous handmade card creations, about 5 new Pandora charms (another obsession, don't ask), and 7 of these fabulously wicked images available at Kraftin' Kimmies. I love these girls because most of them look like they are up to some sort of shenanigans! And, boy oh boy...are they a blast to color!!

I have been in a coloring frenzy since they arrived, but when it came to start assembling cards, Charlotte demanded my attention first. Look at the smirk on her face...just what has this little girl been up to?! Do you remember the old movie, The Bad Seed? Hahaha...I'm just sayin'! Those dollies look like they have been through the ringer...literally...lol!

Check out Kraftin' Kimmies blog for some amazing samples made with these stamps. They are part of the Moonlight Whispers line and are by fabulous artist, Annie Rodrigue. I'm going to keep this post short because I have more of these cards to put together and I don't want to keep these images waiting! See you soon with more ;D

Friday, February 19, 2010

It's good to be the king!


Good Morning! This card is a birthday card for my husband's boss. It's challenging for me to create a masculine card and it's even harder for me to adhere to the unspoken "rules" that apply to these types of cards. Rules? You've never heard of the "rules" for making Dude Cards? Sure you have...you know...stick with blues and browns...no ribbon...no flowers...no gemstones. Yes, those are the ones!! I did happen to stick to that color palette on this card, but only because my Stampotique fellow seemed to sort of just go in that direction when I was coloring him up. I let him have complete creative control on this one and this is the direction he took. I added the crown from a Tim Holtz set and the sentiment is computer generated. Do you remember this line from the Mel Brooks movie, The History of the World Part 1? It's a side-splitter! It seemed like a perfect pairing for this image. I really hope Kirk's boss has a sense of humor ;D

Wednesday, February 17, 2010

Here's the photo...


Here's the card I was photographing in my previous post. It is actually sample number 3 for my March class at China Phoenix. This class will focus on using the beautiful Muertos stamps from Bombshell Stamps and combining them with my absolute favorite coloring tool...Copic Markers. The two were practically meant for each other ;D

I'm ready for my close-up, Mr. De Mille


I just did a quick little Google on this famous movie line from Sunset Boulevard and was surprised that it is often misquoted...as in my case now...LOL! The line is actually "All right, Mr. De Mille. I'm ready for my close-up". YIKES! My apologies to all of the celluloid aficionados out there!

Oops, I got off target a bit :) This post is dedicated to my photo set-up for taking pictures of my cards. Nope, nobody has asked for it and I have not received numerous compliments on the composition of my pics (actually, I haven't received any...LOL), but I have seen lots of places on the Internet with folks posing the question "should I buy a light box". About a year ago, I was lost in the same conundrum and wanted to figure out a way to add some life to my photos. No matter how hard I tried, they always seemed gray and dull. The colors were never vibrant and never portrayed the card accurately. I started to comb the Internet for tips on remedying these ailments.

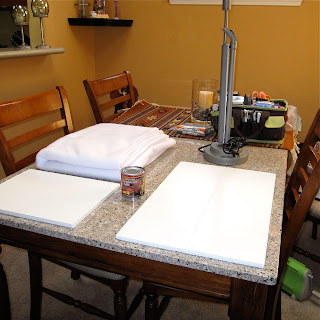
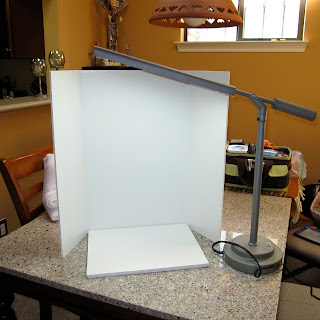
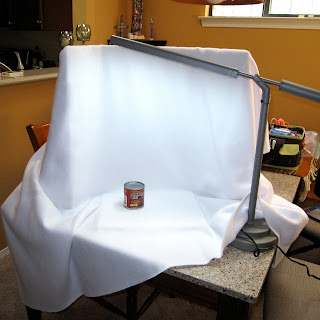
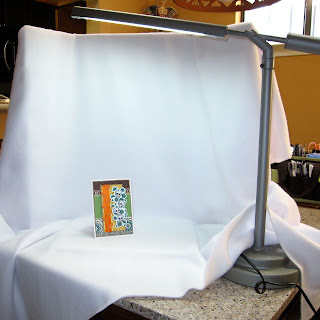
Here's what I came up with:

1. There is no need to invest in an expensive light box. The pictures above show my set-up, which consists of a tri-fold presentation board (the kind used for Science Fair projects), an Ott Light, 2 yards of white fleece fabric, and a can of condensed milk...hahaha! I bet that last item got your attention ;D I arrange the fabric over the tri-fold presentation board and then set up my Ott Light to cast light down over the draped fabric. My can of condensed milk is just the right size to prop my card against and does not obstruct my shot in any way. I purchased all of these items, except for the milk, from my local Hobby Lobby for just a few dollars. The whole set-up takes only a few minutes to assemble and even less time to take down.

2. Before I shoot any pictues, I make a few adjustment to my camera. First, I turn off the flash. Using the flash seems to create glare and hotspots in my photos, which in turn drown out details on my card. Me no likey this :(

3. Speaking of details...I want to capture all of them, so I switch my camera to the Macro setting. This allows me to get in really close and not waste any of the hard work spent crafting my little art piece.

4. After I have adjusted my settings and set-up my make shift light box, I manually set the White Balance by going to the White Balance setting on my camera, selecting "custom", aiming my camera at my little staging area so that only the white fleece fabric fills my lens and (on my camera) clicking the DISP button. This step may vary, but will probably be similar for many point and shoot cameras. Once I do that, I am ready to get this show on the road!

5. I get in really close for photos and take LOTS of pictures. Since I am going to the extra effort, I may as well make it worth my while. There is no bigger let down than setting all this up, taking one shot, and then finding out that it is blurry because my hand quivered a bit at the last second. UGH!

6. Once I have my pics and have loaded them on the computer, I do a little editing and select only the best ones, weeding out the ones that just aren't quite there. After I have the creme de la creme of photos sorted out from the...ummm...not so creme photos, I do a bit of editing in my photo editor. I crop out a lot of the background, brighten my white levels, and adjust the sharpness.

Compared to propping the card on the dining room table and just letting the camera do it's thing, there is an amazing difference! I figure, if I am going to take the time and creative energy to build a card for someone special, then I may as well attempt to present my work in the best possible light (pun intended) to the rest of the world. My pics may not be on the caliber of a professional photog, in fact, I can guarantee they're not, but with the use of a few tools and camera adjustments I can easily take a picture from gray and dull to vibrant and bright. Me likey that ;D

Oh WOW! Did I just do my first tutorial? Maybe? Just a wee bit? Please say "yes"!

Pink Star's Amazing Blog Candy!!


Have an insatiable sweet tooth and don't know how to quench the need for sugary confections? I have two words for you...BLOG CANDY!! BIG BLOG CANDY! Check out Pink Star's blog and leave her a comment on her blog candy post by February 28th for a chance to win this huge pile of crafty goodness. You'll be glad you did!

By the way, she is the February guest designer over at Bombshell Stamps. Peruse her blog for boat loads of inspiration and a peek at those terrific bombshells in action ;D

Monday, February 15, 2010

Hmmm...what to post...?


I just hate not having a Monday post. It seems like the proper way to start the week is to have a blog post and a couple of pics to get those creative wheels turning. Since I don't have a new card, I jumped into my Way Back Machine and found this card I made for a friend's birthday last August. I never posted it to my blog, so I don't consider this cheating...lol! Since I am in a Muertos state of mind these days, I thought it was more than fitting.

You may recognize the image from an altar card I previously featured on here, but if the calendar in my teeny tiny brain is accurate, I believe I made this card first. This fab image is by Invoke Arts, but it's such a popular image that I have seen it used by lots of rubber stamping companies. I think I have it in at least 4 different sizes and incarnations. I like this one because it focuses solely on our skeletal friend, does not have the roses behind it, and it is not in a frame. This makes it ever so versatile.

After coloring the skelly with Copics, I covered the image using a Versamarker pen and embossed it with clear embossing powder 3 or 4 times. This gives it a raised lacquer finish that's not too shiny. After that, I added distress ink to the background and edges, and adorned it with my favorite crackle cube by Stampers Anonymous and an elegant flourish by Hero Arts. Lots of layered paper, a sprinkling of random embellishments, and a dash of glitter glue finish this card off.

I delivered it to my friend with a gift card to her favorite restaurant tucked into the inside pocket and the card neatly packed into a matching presentation box. If memory serves me correctly, I believe she liked it ;D

Sunday, February 14, 2010

Sugar Skull


Hello everyone! Here is card number two of the March class I will be teaching at China Phoenix. This card uses another beautiful set of stamp images by Bombshell Stamps called Altar Skulls. I love the sugar skull with the candles behind him and felt this cried out for some attention from my Spica Glitter Pens. I added lots of subtle glitter accents after I colored the image with Copic markers. It is hard to catch a glimpse of the glitter in these photos, but it's there...trust me! I kept embellishments to a minimum on this card as the image really is the focal point. The oval panel the image is sitting on has been distressed with lots of Antique Linen and Vintage Photo Distress Ink, plus a crackle stamp cube by Stamper's Anonymous. This cube is fabulous and offers a crackle stamp image in 4 degrees of crackle. I keep this stamp handy and use it one way or another on lots of projects. It just adds a little some'in, some'in...if you know what I mean.

I need one more sample for the March class, so cross your fingers for me and check back to see if I have come up with one :) BTW, I hope your Valentine's Day has been filled with lots of your favorite things, whether that's chocolate, roses, champagne or all the above ;D

Thursday, February 11, 2010

Senora Muerta


Hello all! I have been very negligent of my blog as of late and for that I apologize. It's been over a week since my last post and that is just unacceptable. Please forgive me ;D

This card is the first of a trio of cards I am doing for my March 20th class at China Phoenix. This beautiful muertos rubber stamp image is by Bombshell Stamps. They offer a whole line of muertos stamps and I will be featuring 2 more cards in the next few days using more images from this line. I have also been hanging out at the Bombshell Gallery and I am not exaggerating when I tell you that place is filled to the brim with inspiration. For this card, I used the color insert from the stamp package as my color guide, then I took style ideas from a couple of cards found in the gallery. First, I really love Gabby's beautiful card featuring this same image and I especially like the way Senora Muerta fits perfectly on this elegant die cut panel. I also love the torn edges of MissLedz's gorgeous card and am really drawn to the way the pale yellow roses peek out from behind the black patterned panel. So, I would like to give great big kudos to these very talented paper artists and thank them for sharing their lovely creations. This gallery is truly a plethora of fabulous artwork so pay a visit if you have a few moments to spare and want to be blown away with some cool stuff.

I also bunched a small piece of black lace together and added it to the top of the image. It reminded me of the black lace you might find on a funeral veil and it seemed to work perfectly with the stamp image. And, of course, no card is complete without 2 or 3 flowers and a few gemstones.

Well, that's it for today. Just a short post, but I'll be back soon with 2 more cards to round out March's class. Have a great day!

Wednesday, February 3, 2010

My Heart Has Wings


Good Morning. Well, it looks like I spoke too soon and jinxed the fab weather we were having. Today, unfortunately, has brought us clouds, rain and that oh so blah feeling of dampness mixed with cold temperatures. Even my awesome new skylights couldn't muster up a little brightness for these pictures, so let's give a shout out to photo editing programs across the land. YAY, iPhoto!!

This is another Valentine's Day card I created using an older image by Christine Adolph for Stampington. Beautiful as it is, the butterfly did not exactly fill me with that Vday feeling, so a punched heart found it's way to the card to amp up the romance quotient. I slathered a thick coat of Diamond Glaze on the butterfly to achieve that extremely shiny finish. Do you ever work with dimensional lacquer? Give it a try. It is so easy. Just outline the image with the lacquer then fill it in, sort of like decorating cookies with royal icing. Make sure that the lacquer forms a nice thick layer and don't be stingy. Oh! And most importantly...NEVER shake the bottle! You'll end up with all sorts of air bubbles, which is great if you want the finish to look like the craggy surface of Mars, but not so great for non-plantetary projects. The only other drawback to using this stuff is that it takes a good long while to dry. What's that you ask? Why yes, that is a fingerprint on the butterfly's wing, because Miss Instant Gratification couldn't leave well enough alone for an hour or two. Ah, the charm of a handmade card ;D

Hmmm...it's starting to snow. I hope you're keeping warm at your end of the keyboard.

Monday, February 1, 2010

Love


Here's another Valentine's Day card using an image by Christine Adolph for Stampington. This card is a bit simpler than the others, but I think it certainly gets the Vday message across :) Sometimes short and simple is just the right combination.

It is bright and sunny here in Albuquerque...a glorious start for the week. Hope your week is starting out with a bit of sunshine, too :D